Tuesday, March 3, 2015

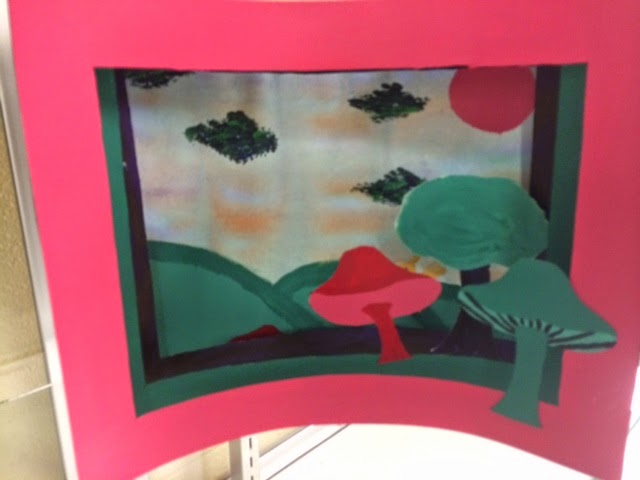
Surreal Tunnel Books

Surreal Tunnel books


I teach an elective in 8th Grade called Contemporary Art.  While I realize Surrealism was a movement that came out of the Modern Art Era, contemporary artists continue to create surreal imagery.  The idea of surrealism really resonates with my students and they are excellent at discussing surrealism.  When I showed Magritte’s The Treachery of Images, there was instantly a buzz of side conversation as apparently this image in on a shirt in The Fault in Our Stars.  Whenever there is relevancy within popular culture, the students love it.  


My students were tasked with creating a surreal tunnel book and we spent a considerable amount of time in the planning process.  Some people go to that off-the-wall surreal place effortlessly while others require a more involved process.  The best tip I had for the kids who seemed to struggle with coming up with an idea was to establish a place (a desert, a landscape, a sky, outer space) and then add surreal elements into that place.  

This is the process along with instructions on putting a tunnel book together:


1.  I had my students start with a 2d sketch. It's okay if your idea changes or develops further in the process but I needed to see a general pencil sketch of their plan.


2.  Next, paint a background, mine was 11x14.


3.  Next, cut out frames (mine were 11x14) and create "props" or items which will be attached to those frames.  My props are a combination of painted imagery (the tree) and edited and printed out images (butterflies, children, animals).  You will also want to do a poster board backing behind your props so they stand up the right way.  Also, paint your frames however you want.

4.  Attach all props (tree, butterfly, children) to frames


This is what you will have:

Now, let's talk about how to attach the accordion sides.  You will need:
1.  2 11x9 inch black papers
2.  a white colored pencil
3.  masking tape
4.  your background
5.  your 3 frames


First, lets prepare the accordion sides.  Start with 2 9x11 black papers.

1.  Fold in half

Fold the top part back (sort of like how you fold back wings of a paper airplane).

Fold the bottom back.

You will have four sections.  Fold each section in half and you may have to make a fold go the opposite way in order to have 8 sections that go back and forth like a fan.  This is what it will look like:

Do that with both papers.

We only want 7 sides.  Since I don't know how to fold 7 even sides, I just fold 8 and cut one off.


You should have 2 accordion folded black papers with 7 sides.


Number the sides 1-14 like this:


Now, attach the background to number 7 and number 14.


Next, tape 5 and 10.

Attach your back frame to 5 and 10.


Tape 3 and 12.

Attach your next frame to 3 and 12.

Tape 1 and 14.

Attach front layer to 1 and 14.  You are finished!


Student Examples:


Thursday, February 12, 2015

Mario Art Installation


I teach an 8th grade contemporary art class at my school.  I decided to do a collaborative art installation project with my students.  This project is intended to be completely student led, so students drove the project from beginning to end.  We began with a class discussion about art installations and then as a class, we brainstormed possible concepts and locations for our installation.  Several students had been looking at the work of French street artist, Invader earlier this year.  We decided to piggyback on the video game theme and create a Mario world as our installation.  My students couldn't have worked together better.  They really came together to plan, problem solve, and execute the project.  They seemed to recognize each other's strengths and as a result I think everyone pulled their weight.  I am so proud of their work.  


Saturday, January 24, 2015

6th grade activist art, Keith Haring style

This year my sixth graders have spent a lot of time creating art that says something.  We started with narrative self portraits and focused on the element of storytelling in artmaking.  Later, they created a surreal scene and then, for this project, looked at the art of Keith Haring and created a piece of artwork based on a social justice issue of their choice.  Their thoughtfulness and creativity amazes me!


Wednesday, January 14, 2015

Word Crimes


After looking at various types of street art, we took inspiration from street artists who create stickers and posters and make comments about popular culture.  After viewing Wierd Al's "Word Crimes" video my students could certainly relate to seeing and using word crimes on a regular basis.  Some students even used real word crimes they found in their texting history.  We used the idea of "word crimes" as our message and each student created four 2.5"x2.5" magnets which will be placed in a magnetic surface in our school.  I love the way this project makes such a real life connection.